Embarking on a bathroom renovation is an exciting prospect, but beneath the visible aesthetics lies a critical, often overlooked, component: waterproofing. Inadequate waterproofing can lead to costly and unhealthy issues down the line, from structural damage to mold growth. As a homeowner, understanding the scope of waterproofing is not just about preventing problems; it's about ensuring the long-term health and value of your home.
This guide empowers you to ask informed, specific questions about bathroom waterproofing. Use it as a framework to engage with contractors, compare bids, and oversee the work. By focusing on the scope—what will be waterproofed, how, and with what materials—you can proactively safeguard your investment. Each section provides context, specific questions, and actionable advice. Keep this guide handy during consultations, when reviewing proposals, and throughout the renovation process. Remember, local permits, licensing, contracts, technical requirements, and property conditions must be verified locally, as standards can vary significantly.
Why Bathroom Waterproofing Demands Your Attention
Water is essential to our daily lives, but uncontrolled moisture within your home can be a destructive force. Bathrooms, by their very nature, are high-moisture environments. Without proper waterproofing, water can seep into walls, floors, and sub-structures, leading to a cascade of problems that are often hidden until significant damage has occurred.
Beyond structural integrity, moisture intrusion creates ideal conditions for mold and mildew growth. These can degrade indoor air quality, potentially contributing to respiratory issues and other health concerns for occupants. The U.S. Environmental Protection Agency (EPA) emphasizes that controlling moisture is paramount for maintaining healthy indoor air quality and preventing mold growth. [EPA: Moisture Control Guidance]
The Hidden Costs of Inadequate Waterproofing
The immediate cost savings from cutting corners on waterproofing are almost always dwarfed by the expense of future repairs. These hidden costs can include:
- Structural Damage: Rotting wood framing, compromised subfloors, and weakened structural elements.
- Mold Remediation: Professional removal of mold, which can be extensive and require specialized equipment and procedures.
- Finish Damage: Peeling paint, crumbling grout, warped flooring, and stained drywall.
- Reduced Property Value: Undisclosed moisture issues can significantly impact a home's market value.
- Health Impacts: Potential medical expenses related to poor indoor air quality.
Investing in a robust waterproofing strategy upfront is a preventative measure that protects your home, your health, and your finances.
Understanding Bathroom Wet Zones and Transitions
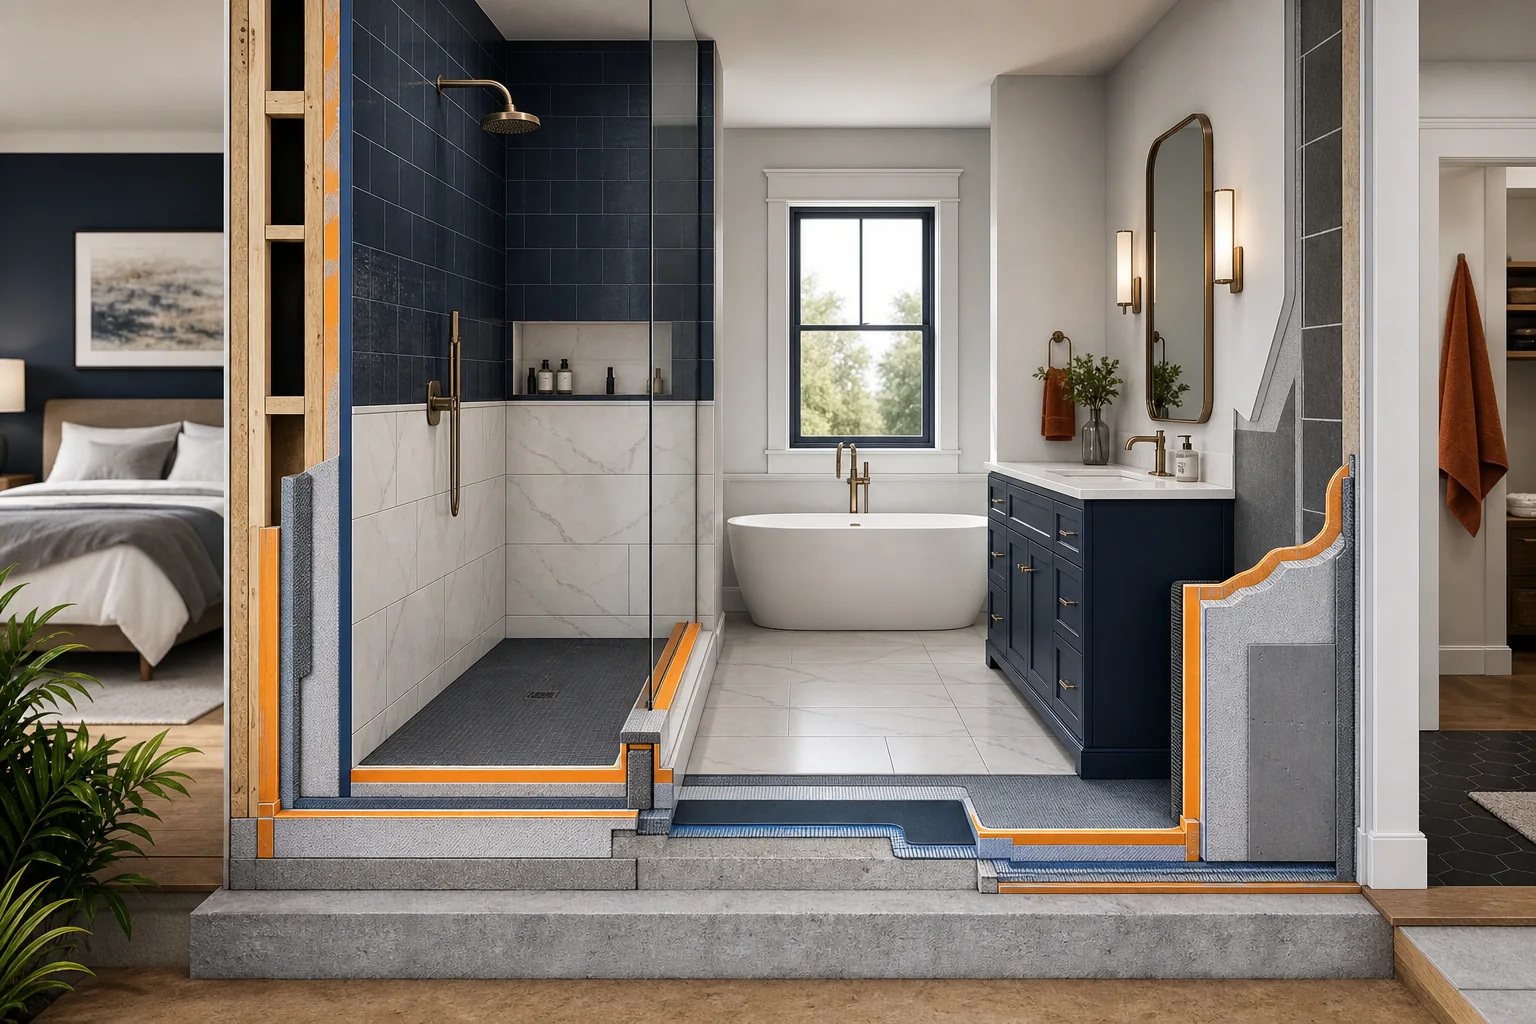
Not all areas of a bathroom require the same level of waterproofing. Identifying and understanding the different "wet zones" is crucial for discussing the scope of work with your contractor. These zones dictate where waterproofing membranes, sealants, and other protective layers are most critical.
Defining Direct Wet Areas
These are the areas that experience direct and frequent water exposure, often for extended periods. They demand the highest level of waterproofing protection.
- Shower Pans and Floors: The entire floor area within a shower enclosure, including the curb. This is arguably the most critical area.
- Shower Walls: Walls directly exposed to shower spray, typically extending from the shower pan up to a certain height (often 6-8 feet or to the ceiling).
- Tub Surrounds: Walls directly above and around a bathtub, especially if a shower head is present.
- Steam Shower Enclosures: These require an even more robust and continuous vapor barrier system due to the extreme heat and moisture.
For these areas, a continuous, impermeable barrier is essential to prevent water from penetrating the substrate.
Identifying Indirect Wet Areas
These zones experience splashes, spills, and condensation, but not the sustained direct water flow of a shower. While less critical than direct wet areas, they still require protection to prevent long-term moisture damage.
- Bathroom Floor (outside the shower/tub): The floor area around the toilet, vanity, and general traffic zones. Spills and splashes are common here.
- Lower Walls (outside the shower/tub): The bottom 12-18 inches of walls adjacent to the toilet, vanity, or general floor area.
- Behind Toilets and Vanities: Areas where plumbing connections are made, which are susceptible to leaks or condensation.
Protection in these areas might involve water-resistant backer boards, sealed grout, and appropriate flooring materials, rather than full waterproofing membranes.
Critical Transition Points
These are the junctions where different materials meet or where penetrations occur. They are often the weakest links in a waterproofing system and require meticulous attention.
- Floor-to-Wall Junctions: Where the shower pan or bathroom floor meets the vertical walls. This seam is a prime target for water intrusion.
- Curbs and Bench Seats: The top, sides, and interior of shower curbs and any built-in bench seats.
- Niches and Recesses: Built-in shower niches or shelves, which must be fully waterproofed internally.
- Plumbing Penetrations: Where shower valves, spouts, and drain assemblies pass through the waterproof layer. These require specialized sealing.
- Door and Window Openings: Any windows or shower doors within a wet zone must have proper flashing and sealing to prevent water migration.
A continuous, seamless transition across these points is vital. Any break in the waterproofing layer can compromise the entire system.
From Components to Coherent Waterproofing Systems
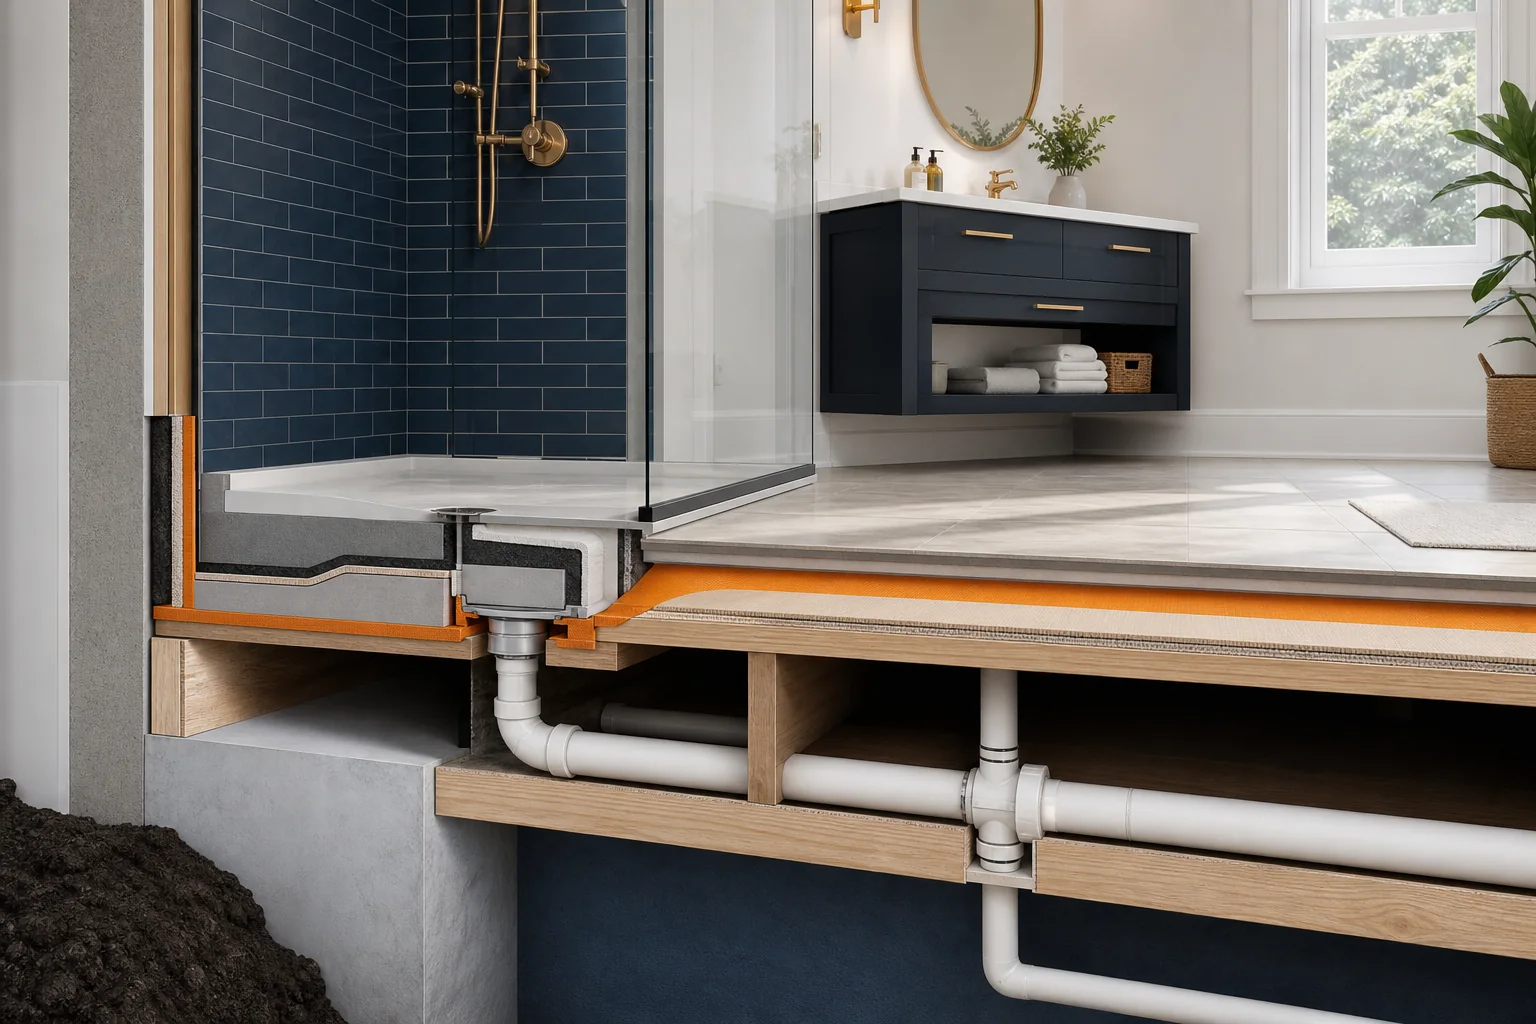
Effective bathroom waterproofing isn't about simply applying a single product; it's about creating an integrated, continuous barrier using compatible components that work together as a system. Homeowners should understand this distinction to ensure their contractor isn't just using disparate products but installing a cohesive solution.
The Pitfalls of Piecemeal Approaches
A common mistake is to treat waterproofing as a collection of individual products applied independently. For example, using a water-resistant backer board, then a different brand's liquid membrane, and then a third brand's sealant for penetrations. While each product might be effective on its own, their chemical and physical compatibility might not be guaranteed, leading to potential failures at their junctions.
This piecemeal approach can result in:
- Incompatible Materials: Products from different manufacturers may not bond effectively, creating weak points.
- Voided Warranties: Many manufacturers offer system warranties that are only valid if all components used are from their own integrated line.
- Unforeseen Failures: The weakest link in a non-integrated system can lead to widespread moisture intrusion.
Advantages of an Integrated System
An integrated waterproofing system consists of components (backer boards, membranes, sealants, drains, etc.) specifically designed and tested to work together by a single manufacturer. This approach offers several benefits:
- Guaranteed Compatibility: All components are engineered to bond and perform optimally together.
- System Warranties: Manufacturers often provide comprehensive warranties covering the entire system, offering greater peace of mind.
- Predictable Performance: The system's performance is backed by manufacturer testing and specifications.
- Simplified Installation: Contractors familiar with a specific system can often install it more efficiently and correctly.
When discussing waterproofing, always ask your contractor about the specific "system" they plan to use, not just individual products.
Key System Components to Discuss
While the specific components will vary by system, these are the general categories to inquire about:
- Substrate Preparation: What steps will be taken to ensure the underlying surface (framing, subfloor) is sound, clean, and ready for waterproofing?
- Waterproof Membranes: Will it be a topical liquid-applied membrane, a sheet membrane, or a combination? Where will it be applied (walls, floor, curb, niche)?
- Backer Boards/Substrates: What type of backer board will be used (e.g., cement board, foam board, fiber-cement board)? Is it specifically designed to integrate with the chosen waterproofing membrane?
- Sealants and Tapes: How will seams, corners, and penetrations (e.g., around the drain, shower valve, niche corners) be sealed? What specific tapes or sealants will be used?
- Shower Pan/Drain Assembly: How will the shower pan be constructed (e.g., pre-sloped foam pan, mortar bed)? How will the drain be integrated into the waterproofing system to ensure a watertight seal?
- Curb and Bench Construction: How will these elements be built and waterproofed to prevent water from pooling or seeping through?
Essential Questions for Your Contractor
These questions are designed to elicit detailed information about your contractor's waterproofing plan. Don't be afraid to ask for specifics and clarification. The more detailed their answers, the more confidence you can have in their expertise and the thoroughness of their work.
Scope Definition and Coverage
- "Please describe the full extent of the waterproofing you propose for my bathroom. Which specific areas (e.g., shower walls, shower floor, entire bathroom floor, lower walls around vanity/toilet) will be waterproofed, and to what height?"
Why it matters: This clarifies the boundaries of protection. Ensure it aligns with your understanding of direct and indirect wet zones.
- "Will you be installing a continuous waterproofing system, or will it be a combination of different products? If a system, which manufacturer's system will be used?"
Why it matters: Distinguishes between integrated systems and piecemeal approaches, impacting compatibility and warranty.
- "How will you address critical transition points, such as floor-to-wall junctions, shower curbs, niches, and plumbing penetrations, to ensure a continuous seal?"
Why it matters: These are common failure points. Specifics here indicate attention to detail.
Material Specifications and Compatibility
- "What specific waterproofing membrane(s) will be used (e.g., liquid-applied, sheet membrane)? What are their manufacturer specifications and warranty details?"
Why it matters: Identifies the core waterproofing material. Researching manufacturer specs can confirm suitability.
- "What type of backer board or substrate will be used in the wet areas (e.g., cement board, foam board)? How does it integrate with the chosen waterproofing membrane?"
Why it matters: Ensures the substrate is appropriate and compatible with the waterproofing layer.
- "What type of sealants, tapes, and thin-set mortar will be used, and are they compatible with the waterproofing system and tile materials?"
Why it matters: Compatibility of all components is crucial for system integrity.
- "For the shower pan, will it be a pre-sloped pan or a custom mortar bed? How will the drain be integrated into the waterproofing system?"
Why it matters: The shower pan and drain are paramount. Proper slope and drain integration prevent standing water and leaks.
Installation Procedures and Quality Control
- "What steps will be taken for surface preparation before applying the waterproofing? (e.g., cleaning, leveling, priming)"
Why it matters: Proper surface prep is essential for membrane adhesion and performance.
- "How will you ensure proper slope to the drain in the shower pan to prevent water pooling?"
Why it matters: Standing water is a breeding ground for mold and can compromise grout and tile over time.
- "Will a flood test be performed on the shower pan before tiling? If so, for how long, and what is the procedure?"
Why it matters: A flood test is the most reliable way to verify the integrity of the shower pan waterproofing before it's covered up.
- "What quality control measures do you have in place during the waterproofing installation to ensure it meets manufacturer specifications and industry best practices?"
Why it matters: Demonstrates the contractor's commitment to proper installation, not just using the right materials.
Warranty and Post-Installation Assurance
- "What is the warranty on the waterproofing work itself, separate from product warranties? What does it cover, and for how long?"
Why it matters: Distinguishes between material defects (manufacturer warranty) and installation defects (contractor warranty).
- "Will I receive documentation, such as manufacturer warranty certificates or installation guides, for the waterproofing system used?"
Why it matters: Important for future reference, maintenance, and potential warranty claims. Keep these with your home records.
The Homeowner's Master Waterproofing Checklist
This checklist consolidates the key considerations and questions into an actionable format you can use at various stages of your renovation. It serves as a comprehensive tool for both planning and oversight.
Pre-Construction Planning Checklist
- Define your bathroom's wet zones (direct, indirect, transitions) based on your usage and layout.
- Research reputable waterproofing systems and their components.
- Prepare a list of specific questions for each contractor based on the "Essential Questions" section.
- Request detailed proposals that explicitly outline the waterproofing scope, materials, and procedures.
- Verify contractor licensing, insurance, and references.
- Confirm that the proposed waterproofing system aligns with local building codes and technical requirements. (Remember: local verification is key!)
- Discuss the contractor's experience with the specific waterproofing system they propose.
During-Construction Verification Checklist
- Confirm that the substrate preparation (e.g., framing, subfloor, backer board installation) is complete and correct before waterproofing begins.
- Observe the application of waterproofing membranes, ensuring full coverage and proper detailing at corners, seams, and penetrations.
- Take clear, dated photographs and videos of the waterproofing layers before they are covered by finishes.
- If a flood test is planned, confirm its execution, duration, and the results.
- Ensure all components of the chosen waterproofing system are being used as specified by the manufacturer.
- Address any questions or concerns immediately with your contractor. Document these discussions.
Post-Construction Documentation Checklist
- Obtain all manufacturer warranty documents for the waterproofing system.
- Receive a written warranty from your contractor for the waterproofing installation.
- Compile all photographs, videos, and notes related to the waterproofing installation.
- Store all documentation in a safe, accessible place for future reference.
- Understand any specific maintenance requirements for your new bathroom finishes that might impact waterproofing longevity (e.g., grout sealing).
A Framework for Comparing Bids and Controlling Work
Comparing contractor bids for a bathroom renovation can be challenging, especially when waterproofing details are often buried or omitted. This framework helps you standardize your inquiry, evaluate proposals critically, and monitor the work effectively.
For a broader approach to evaluating contractor proposals, consider using a contractor quote comparison scorecard to systematically weigh different aspects of each bid.
Standardizing Your Inquiry
Before soliciting bids, create a detailed scope document or use the "Essential Questions" section of this guide as a questionnaire. Provide this to every contractor you interview. This ensures that all bids are based on the same set of expectations regarding waterproofing, making direct comparisons much easier.
Key elements to standardize:
- Required Coverage: Clearly state which wet zones you expect to be fully waterproofed.
- System Preference (if any): You might specify a preference for an integrated system from a reputable manufacturer.
- Documentation Requirements: Request photos, flood test results, and warranty information as part of the project deliverables.
Evaluating Proposal Details
When reviewing bids, look beyond the bottom line. A lower price might indicate a less comprehensive waterproofing plan, which could cost you more in the long run.
| Evaluation Criteria | What to Look For | Red Flag |
|---|---|---|
| Waterproofing Scope | Explicit mention of all wet zones (shower floor, walls, curb, niches, floor around toilet/vanity) and their treatment. | Vague terms like "waterproofed shower" or no mention of specific areas. |
| Materials Specified | Brand names and types of membranes, backer boards, sealants, and drain systems. Confirmation of an integrated system. | Generic terms like "standard waterproofing materials" or a mix of unrelated brands. |
| Installation Process | Description of surface prep, application layers, sealing of penetrations, and flood testing. | No mention of installation steps, especially flood testing. |
| Warranty | Clear terms for both material (manufacturer) and labor (contractor) warranties, including duration and coverage. | No mention of warranty or only a general "satisfaction guarantee." |
| Documentation | Commitment to provide photos, manufacturer guides, and warranty certificates. | No mention of providing project documentation. |
If a proposal lacks detail in any of these areas, consider it an opportunity to ask follow-up questions. A contractor who is transparent and thorough in their proposal is more likely to be thorough in their work.
Monitoring Progress and Adherence
Once work begins, use your checklist and the agreed-upon scope to monitor progress. This isn't about micromanaging, but ensuring that the critical, hidden layers of your bathroom are installed correctly.
- Scheduled Check-ins: Arrange specific times to review the waterproofing work before it's covered up.
- Photo Documentation: Take your own photos at key stages, especially after backer board installation, membrane application, and before tiling.
- Refer to the Plan: Compare the ongoing work against the detailed proposal and manufacturer specifications.
- Address Deviations: If you notice any deviations from the agreed-upon plan, discuss them immediately with your contractor. Document any changes or change orders. For guidance on managing changes, refer to our renovation change order checklist.
Red Flags: Warning Signs of Potential Issues
Being an informed homeowner means recognizing when something might be amiss. These red flags, particularly concerning waterproofing, should prompt further investigation or reconsideration of your contractor choice. The Federal Trade Commission (FTC) advises consumers to be wary of high-pressure sales tactics and contractors who are reluctant to provide detailed information. [FTC: How to Avoid Home Improvement Scams]
Vague or Incomplete Proposals
- Lack of Specifics: The proposal only mentions "waterproofing" without detailing the areas, materials, or methods.
- No Brand Names: The contractor avoids naming specific manufacturers or systems, instead using generic terms.
- Missing Warranty Information: No mention of a warranty for the waterproofing work or materials.
A professional contractor should be able to clearly articulate their plan and the products they intend to use.
Unfamiliarity with Systemic Approaches
- Piecemeal Product Use: The contractor describes using various products from different manufacturers without explaining their compatibility as a system.
- Dismissing Integrated Systems: They downplay the importance of using a manufacturer's integrated system or claim it's "overkill."
- No Knowledge of Manufacturer Guidelines: They cannot readily discuss or provide manufacturer installation instructions for their chosen products.
This suggests a lack of understanding of modern waterproofing best practices, which heavily favor integrated systems.
Pressure Tactics and Unrealistic Timelines
- "Limited-Time Offer": Pressuring you to sign a contract immediately without adequate time to review the waterproofing details.
- Unrealistic Speed: Promising an impossibly fast completion time for the waterproofing phase, which often indicates rushed work or skipped steps.
- Discouraging Questions: Becoming defensive or dismissive when you ask detailed questions about their waterproofing methods.
Good contractors welcome informed questions and provide ample time for decision-making.
Lack of Documentation or Transparency
- Refusal for Flood Test: The contractor states a flood test is unnecessary or refuses to perform one.
- No Photo Documentation: They are unwilling to provide photos of the waterproofing layers before they are covered.
- No Manufacturer Warranties: They cannot or will not provide manufacturer warranty information for the waterproofing products.
Transparency and documentation are crucial for verifying hidden work and for future reference.
Worked Example: Scoping a Primary Bathroom Shower Remodel
Let's consider a homeowner, Sarah, who is remodeling her primary bathroom. She wants a large walk-in shower with a bench and a niche. She's received a few bids and is now using this guide to refine her understanding and questions.
Project Overview and Initial Concerns
Sarah's existing shower has shown signs of old grout failure, and she suspects some underlying moisture issues. She wants to ensure the new shower is completely watertight and durable. Her primary concerns are the shower pan, the new bench, and the niche.
Applying the Question Framework
Sarah uses the "Essential Questions" to interview her top two contractors. Here's a snippet of her interaction with Contractor A:
Sarah: "Can you describe the full extent of the waterproofing you propose for the shower? Which specific areas will be waterproofed, and to what height?"
Contractor A: "For your shower, we'll waterproof the entire shower pan, including the curb and bench, and the walls up to the shower head height, plus the niche. We use a reputable manufacturer's integrated system."
Sarah: "Which specific manufacturer's system will be used, and what type of membrane?"
Contractor A: "We use the [Specific Manufacturer] system. It involves a pre-sloped foam shower pan, their proprietary sheet membrane for the pan and walls, and their specific sealing tapes for all seams and penetrations. The backer board will be their compatible foam board."
Sarah: "How will you ensure proper slope to the drain, and will a flood test be performed?"
Contractator A: "The pre-sloped pan ensures the correct pitch. After the membrane is installed and sealed, we'll perform a 24-hour flood test. We'll fill the pan with water, mark the level, and check for any drop after a day. We'll also take photos of this process."
Sarah: "What about the warranty?"
Contractor A: "The [Specific Manufacturer] system comes with a 10-year material warranty when installed by a certified professional, which we are. We also provide a 2-year labor warranty on our installation."
Interpreting Contractor Responses
Sarah notes that Contractor A provided specific details, named a reputable manufacturer, confirmed an integrated system, and outlined clear procedures for the shower pan, flood test, and warranties. This aligns well with the recommendations in this guide.
In contrast, Contractor B's proposal was less specific, mentioning "industry-standard waterproofing" and stating a flood test was "usually not necessary" if installed correctly. This raises a red flag for Sarah, prompting her to favor Contractor A due to their transparency and detailed approach to waterproofing.
This example demonstrates how asking targeted questions helps homeowners differentiate between contractors and ensure a robust waterproofing plan is in place.
Defining Evidence Before Finishes Hide the Work
The most critical aspect of waterproofing is that it becomes completely hidden once the tile, flooring, and fixtures are installed. This makes it impossible to inspect later without destructive investigation. Therefore, establishing clear expectations for documentation before the work is covered is paramount.
Pre-Cover Up Inspections
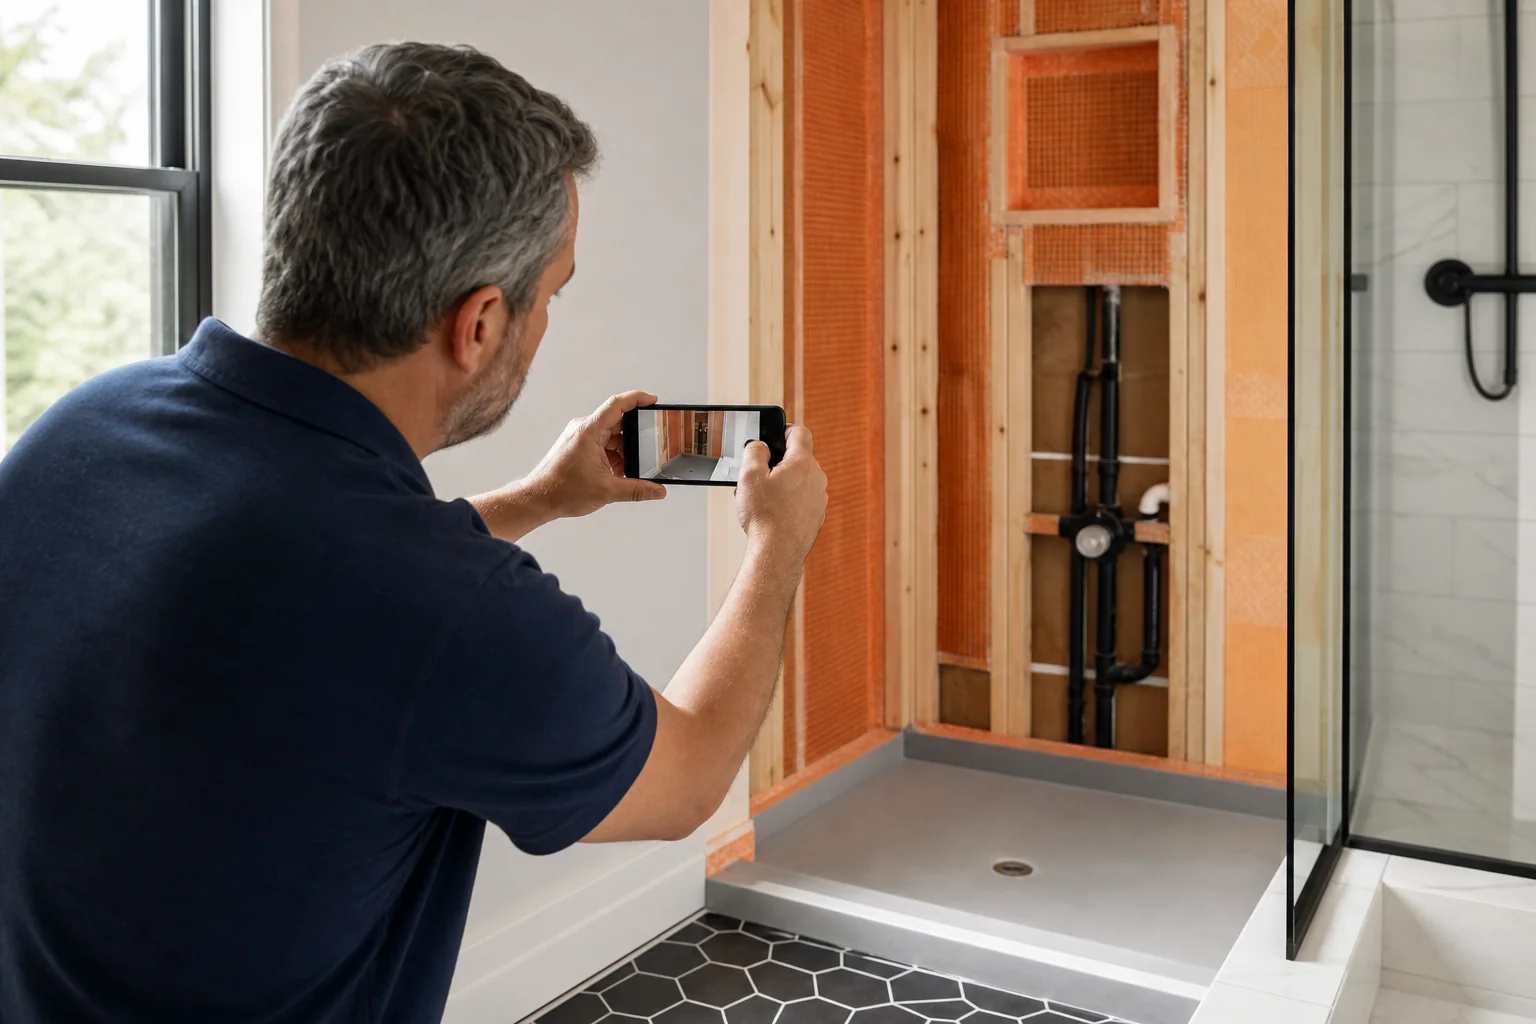
Schedule specific times with your contractor to inspect the waterproofing layers before they are covered. This allows you to visually confirm key aspects:
- Full Coverage: Ensure the membrane extends to all agreed-upon areas and heights.
- Seam and Corner Treatment: Check that all seams, corners, and changes in plane are properly sealed with appropriate tapes or additional membrane layers.
- Penetration Sealing: Verify that all plumbing penetrations (shower valve, spout, drain) are meticulously sealed to the membrane.
- Curb and Niche Integrity: Confirm that curbs and niches are fully waterproofed, without any visible gaps or breaks in the membrane.
- Flood Test Verification: If a flood test was performed, review the results and confirm the absence of leaks.
Don't hesitate to ask questions during these inspections. This is your last chance to see the critical work that will protect your home for years to come.
Photographic and Video Documentation
This is arguably the most important form of evidence. Request that your contractor take detailed, dated photographs and videos of the waterproofing process at various stages. You should also take your own. This visual record serves multiple purposes:
- Verification: Proof that the work was completed as specified.
- Warranty Support: Essential documentation for any future warranty claims.
- Future Reference: Useful if you ever need to perform repairs or modifications in the future, as you'll know exactly where the waterproofing layers are.
Key photo opportunities:
- Bare substrate (framing, subfloor, backer board) before membrane application.
- Applied membrane on walls, floor, curb, and niche.
- Close-ups of sealed seams, corners, and plumbing penetrations.
- The shower pan during a flood test, showing the water level.
Manufacturer Checklists and Sign-offs
Some advanced waterproofing systems come with manufacturer-provided checklists or inspection forms. These forms often require the installer to verify that each step of the installation process has been completed according to specifications. Ask your contractor if such a checklist exists for their chosen system and request a signed copy upon completion.
This adds another layer of accountability and ensures that the contractor is following the precise instructions required for the system's warranty to be valid.
Closeout and Recordkeeping for Long-Term Peace of Mind
The renovation isn't truly complete until all documentation is in order and you have a clear plan for maintaining your new bathroom. Proper closeout and diligent recordkeeping are crucial for protecting your investment in the long term.
Final Walkthrough and Punch List
Before making final payment, conduct a thorough final walkthrough with your contractor. While much of the waterproofing is now hidden, you can still verify the visible results and ensure all agreed-upon elements are complete. Create a punch list of any remaining items or concerns. For a detailed guide on this process, consult our home renovation closeout checklist.
During this walkthrough, specifically confirm:
- All finishes (tile, grout, caulk) are installed correctly and neatly.
- Grout lines are consistent and properly sealed where applicable.
- Caulking at critical junctions (e.g., where tile meets tub/shower base, corners) is continuous and free of gaps.
- The shower drain functions correctly and water drains completely without pooling.
Warranty Registration and Documentation Storage
This is a critical step for waterproofing. Ensure you receive:
- Manufacturer's Warranty Certificates: For the specific waterproofing system used. Register these with the manufacturer if required.
- Contractor's Written Warranty: Covering their labor and installation of the waterproofing.
- All Project Documentation: This includes your contract, detailed proposals, change orders, invoices, and especially all photos and videos of the waterproofing layers.
Store all these documents in a secure, easily accessible location, such as a digital folder backed up to the cloud and a physical binder. This comprehensive record will be invaluable for future maintenance, potential warranty claims, or if you ever sell your home.
Maintenance Guidelines
While waterproofing is designed to be durable, the visible finishes that protect it still require care. Discuss maintenance guidelines with your contractor:
- Grout Sealing: Ask if the grout needs to be sealed, what type of sealant to use, and how often to reapply it.
- Caulk Inspection: Learn how to periodically inspect caulk lines for cracks or deterioration and how to re-caulk if necessary.
- Cleaning Products: Understand which cleaning products are safe for your specific tile and grout, and which might degrade sealants over time.
- Ventilation: Ensure your bathroom ventilation fan is adequately sized and used regularly to remove moisture, reducing the overall humidity burden on your bathroom's surfaces. The EPA highlights proper ventilation as a key strategy for moisture control and indoor air quality. [EPA: Remodeling and IAQ]
Frequently Asked Questions (FAQs)
Do all bathrooms need the same level of waterproofing?
No. The level of waterproofing depends on the "wet zones" present. A powder room with only a toilet and sink will require minimal waterproofing (e.g., water-resistant drywall, sealed floor) compared to a full bathroom with a shower or tub, which demands extensive waterproofing in direct wet areas. Steam showers require the most robust and continuous vapor barrier systems due to extreme moisture and heat.
Can I DIY some waterproofing steps?
While some homeowners might attempt DIY waterproofing, it's generally not recommended for critical areas like shower pans and walls. Proper waterproofing requires specific product knowledge, meticulous surface preparation, precise application techniques, and an understanding of system compatibility. Errors can be extremely costly to fix. For homeowners considering various aspects of a renovation, our renovation budget calculator can help weigh the costs of professional services against potential DIY savings and risks.
How long should waterproofing last?
A properly installed, integrated waterproofing system from a reputable manufacturer, when combined with durable finishes and good maintenance, should last for decades—often 20-30 years or more. The longevity depends heavily on the quality of materials, the skill of installation, and the ongoing maintenance of the visible finishes (like grout and caulk).
What if my contractor doesn't want to answer these questions?
This is a significant red flag. A reputable and professional contractor should welcome detailed questions and be able to provide clear, specific answers about their methods and materials. Evasiveness, defensiveness, or a refusal to provide details suggests a lack of expertise, transparency, or a desire to cut corners. It's advisable to seek another contractor who is willing to engage openly and thoroughly.
Is a flood test always necessary?
For shower pans, a flood test is considered a best practice by many industry experts and manufacturers. It's the most reliable way to verify the integrity of the waterproofing before it's covered by tile. While some contractors might argue it's not always necessary, especially with modern pre-sloped pans, insisting on one provides invaluable peace of mind and an early detection mechanism for potential issues.
How does waterproofing relate to indoor air quality?
Waterproofing is directly related to indoor air quality (IAQ) because it prevents moisture intrusion that can lead to mold and mildew growth. Mold releases spores into the air, which can cause allergic reactions, asthma attacks, and other respiratory problems. By effectively waterproofing your bathroom, you create a barrier against moisture, thereby preventing mold growth and contributing to a healthier indoor environment. The EPA provides extensive guidance on moisture control as a primary strategy for improving IAQ. [EPA: Moisture Control and IAQ]
By asking these critical questions and understanding the answers, you transform from a passive observer into an active participant in your bathroom renovation. This proactive approach ensures that the hidden work of waterproofing is executed to the highest standards, protecting your home and providing lasting value.
This guide organizes a project conversation. It is not engineering, legal, code or trade advice. Property conditions and local requirements must be verified by qualified professionals.